How to Develop an App with Python and Scale Beyond No-Code
So, you’re thinking about building a real app with Python? That usually means picking a backend framework like Django or FastAPI, figuring out your data models, and then building out the API endpoints that a frontend (like React) will talk to. For anyone coming from a no-code background, this is the logical next step to building scalable, ownable tech that blows past the limitations of platforms like Bubble or Airtable.
Why Move From No-Code to a Python App

If you launched your MVP on a no-code platform like Bubble, Webflow, or Airtable, you made the right call. Honestly, there's no better way to test an idea and find product-market fit without sinking a ton of cash into development. But at some point, you hit a wall. A very hard, very real wall.
The things that made no-code so great at the beginning—the speed, the simplicity—suddenly become massive roadblocks. You know you're there when your automations, which are probably duct-taped together with Zapier, start breaking constantly. Or when adding a simple new feature feels like a game of Jenga. And let’s not even talk about those spiraling monthly subscription fees.
The Strategic Shift to Ownable Technology
Making the jump to a custom Python backend is more than just a tech upgrade. It's a strategic business decision. It's the moment you decide to take full control of your product's future. You’re moving from a clever prototype to a real, production-grade asset that can handle serious growth.
This is where you finally get to solve the big-picture problems that no-code just isn't built for. A custom backend gives you the power to:
- Slash Operational Costs: Those expensive per-task charges from Zapier? They get replaced by efficient code running on your own server. The savings can be huge.
- Build Defensible IP: You get 100% ownership of your codebase. This isn't just a line item; it's a critical asset that investors look for and that adds real value to your company.
- Achieve True Scalability: You can finally support thousands of users at once without worrying about the API rate limits or performance bottlenecks that plague Airtable and Bubble.
- Unlock Customization: Need a feature that's unique to your business? With a custom backend, you can build anything. You're no longer stuck inside someone else's box.
Transitioning from a no-code MVP to a Python backend is the moment a founder decides to stop renting their infrastructure and start owning their product. It’s the necessary step to build a scalable, venture-backable company.
Unlocking a World of Talent
Choosing Python is also a smart move when it comes to hiring. Its popularity has absolutely exploded, making it the undeniable number-one programming language in the world. This has created a massive global talent pool of 22.9 million developers.
For founders, this is huge. Migrating your app to a Python and PostgreSQL stack means you can tap into this vast community of experts. In fact, 42% of recruiters now list Python as a top priority skill when they're looking for developers. You can dig into more stats about programming language popularity on codegnan.com.
Ultimately, learning how to develop an app with Python is about setting your business up for the long haul. It's the move you make when you're ready to grow up from a promising idea into a durable, scalable company.
Deconstructing Your No-Code App for Migration
The biggest mistake I see founders make when moving off a no-code platform is jumping straight into coding. A successful migration starts way before you write a single line of Python. It all begins with a deep, honest audit of your existing app, turning all that implicit no-code logic into a clear, actionable blueprint.
Think of it like being an archaeologist. Your job is to carefully excavate your Bubble, Webflow, or Airtable project and map out exactly how it works. This isn't just about preventing scope creep; it's about making sure the new app is a better, more robust version of the product your users already know and use. If you rush this part, you’re setting yourself up for blown budgets and missed deadlines.
Mapping Your Data from Tables to a Relational Model
Let's be real: your no-code app's data structure is probably a collection of fancy spreadsheets. Airtable, for instance, is fantastic for its flexibility, but that same flexibility means it doesn’t enforce the strict relationships a production-grade backend needs. Your first task is to translate this into a proper relational database schema, which will almost certainly be built in PostgreSQL.
For example, in Airtable, you might have a "Projects" table and a "Users" table linked with a simple reference field. In a real relational model, you define this as a formal relationship using foreign keys. This simple change is what ensures data integrity—it's what stops a user from being associated with a project that doesn't even exist.
Here’s a look at a typical Airtable base, where everything is neatly organized but lacks the structural integrity needed for a scalable application.
While this is visually clean, it needs a serious translation into a formal schema with clearly defined relationships and data types for your Python backend. You can get a much deeper understanding of this process in our guide on how to create a database.
A non-negotiable step is to create a visual diagram of your new data model. Use a tool like Miro or Whimsical to map out every table, its columns (fields), data types (e.g., text, integer, boolean), and the relationships connecting them. This visual blueprint is pure gold for a development team.
No-Code Component to Python Stack Translation
Moving from no-code to code can feel like learning a new language. To make it easier, here’s a quick-and-dirty translation guide showing how your no-code tools map to a professional Python and JavaScript stack.
| No-Code Component | Python/Production Equivalent | Why It's a Better Solution |
|---|---|---|
| Bubble's visual workflow editor | Django / Flask API endpoints | Code gives you full control, better performance, and easier debugging than visual logic builders. |
| Airtable/Bubble Database | PostgreSQL with SQLAlchemy ORM | A true relational database ensures data integrity, scalability, and complex query capabilities. |
| Webflow front-end builder | React / Vue.js front-end framework | Component-based frameworks create dynamic, fast, and maintainable user interfaces. |
| Bubble's user management | Custom auth with JWT or a library like Django Allauth | You get granular control over security, roles, permissions, and social login integrations. |
| Zapier/Make automations | Celery for background tasks | Replaces brittle, expensive Zaps with reliable, scalable background jobs that run for pennies. |
This isn't just a one-to-one swap; each of these "production equivalents" opens up a new world of power, performance, and flexibility that no-code platforms simply can't offer.
Documenting Every Critical User Flow
Next up, you have to document every single thing a user can do in your app. And I don’t mean just listing features. You need to map out the entire step-by-step user flow for every action. This is absolutely critical because so much of this logic is currently buried deep inside your no-code platform’s workflow editor.
What actually happens when a user signs up?
- User submits their email and password.
- The system checks if the email already exists in the
Userstable. - If not, a new user record is created.
- An API call is made to a third-party service to trigger a welcome email.
- The user is redirected to their dashboard page.
You need this level of detail for every core action: creating a new project, upgrading a subscription, resetting a password, you name it. This documentation becomes the spec that eliminates all the guesswork for the developers building your API.
Auditing Your Integrations and Automations
Finally, it's time to take a complete inventory of every external tool your no-code app depends on. This is where you’ll often find hidden costs and major points of failure. Most founders I work with are shocked to discover they're spending hundreds or even thousands of dollars a month on Zapier tasks that a custom Python backend could handle for practically nothing.
Make a comprehensive list of everything:
- Third-Party APIs: Stripe for payments, SendGrid for emails, Twilio for SMS.
- Zapier/Make Automations: Every single "Zap" or scenario. What triggers it? What actions does it perform?
- Embedded Widgets: Tools like Calendly, Tally, or Intercom.
For each one, document its purpose and why you need it. This audit shines a light on which integrations need to be rebuilt natively in your Python app and which can stay as they are. This process is fundamental to learning how to develop an app with python that is both lean and powerful. By replacing fragile, expensive automations with solid code, you’re building a much more reliable and scalable product for the long haul.
Alright, you’ve mapped out your no-code app's DNA. Now comes the big one: picking the tools that will become the foundation of your new backend. This is a huge decision. The right tech stack can feel like a rocket ship, propelling you forward and scaling with you. The wrong one? It can lead to a world of technical debt and painful rewrites nobody has time for.
The Python world is full of choices, but for founders coming from no-code, the conversation almost always narrows down to two backend frameworks: Django and FastAPI. They come from different schools of thought, and figuring out their trade-offs is the key to making a smart call.
Django: The Batteries-Included Powerhouse
Think of Django as the full-service, all-in-one toolkit. It’s famous for its "batteries-included" philosophy, which means it comes packed with a ton of features right out of the box. We're talking about a powerful Object-Relational Mapper (ORM) for talking to your database, a rock-solid authentication system, and an admin panel that is, frankly, a lifesaver for managing your app's data.
If you're moving a complex app from a platform like Bubble, Django is often a perfect match. When you've got multiple data models, tricky user permissions, and need a lot of the standard features that make a web app tick, Django saves you from reinventing the wheel. It gives you battle-tested solutions to common problems so you can get building faster.
- Best For: Content-heavy sites, social networks, e-commerce stores, and complex SaaS applications with many moving parts.
- Key Advantage: It’s so comprehensive. You spend less time piecing together basic functionality and more time focused on the unique logic that makes your business special.
FastAPI: The High-Performance API Specialist
On the other end of the spectrum, you have FastAPI. It does exactly what it says on the tin: helps you build incredibly fast and efficient APIs. It’s a newer, more minimalist framework that leans into modern Python features (like type hints) to give you automatic data validation and interactive API documentation. That last part, powered by Swagger UI, is a game-changer for development.
FastAPI is your go-to if your main goal is to create a lightning-fast data layer for a modern frontend, maybe something built with React or Next.js. If you're building a backend for a mobile app or a service that needs to juggle a massive number of simultaneous requests with super low latency, FastAPI absolutely sings. Its performance can even compete with frameworks written in historically "faster" languages like Go or Node.js.
The choice between Django and FastAPI isn't about which is "better"—it's about which is better for your product. Django is built for rapid development of full-featured applications. FastAPI is built for raw API performance and a slick, modern developer experience.
Pairing Your Backend with a Modern Frontend
Whichever Python framework you go with, it’s going to need to serve data to the part of your app that users actually see and interact with. The modern way to do this is with a "headless" or "decoupled" architecture. Essentially, your Python backend is a pure API, and a separate JavaScript framework handles the entire user interface.
This is where frameworks like React or Next.js step in.
- React: An incredibly popular library for building dynamic, component-based user interfaces. Its ecosystem of tools and add-ons is massive.
- Next.js: A framework built on top of React. It adds powerful features like server-side rendering (SSR) and static site generation (SSG), which are fantastic for performance and SEO.
Going with this decoupled approach gives you maximum flexibility. Your Python backend can feed data to your web app, a mobile app, and even other third-party services—all from the same API. This is the architecture that lets a simple MVP grow into a multi-platform powerhouse.
It also helps that Python is the fastest-growing and top-ranked language out there. Finding talent is just easier, especially since 40% of developers already use it for web and mobile backends, a number you can explore further in these mobile development statistics.
Your Six-Week Python App Development Sprint
Migrating from a no-code MVP to a full-fledged Python application can sound like a daunting, never-ending project. It doesn't have to be. With a solid plan, you can turn this transition into a predictable sprint, not a painful marathon. I've found that a focused, six-week timeline is absolutely achievable for most founders moving off platforms like Bubble or Airtable.
This kind of structured approach takes a complex technical challenge and breaks it down into manageable, week-by-week milestones. It brings clarity, keeps the budget under control, and makes sure you and your development partner are on the same page from the start. No guesswork, just a clear path forward.
The timeline below maps out this sprint into three core phases: building the foundation, implementing key features, and finally, launching your new, more powerful app.
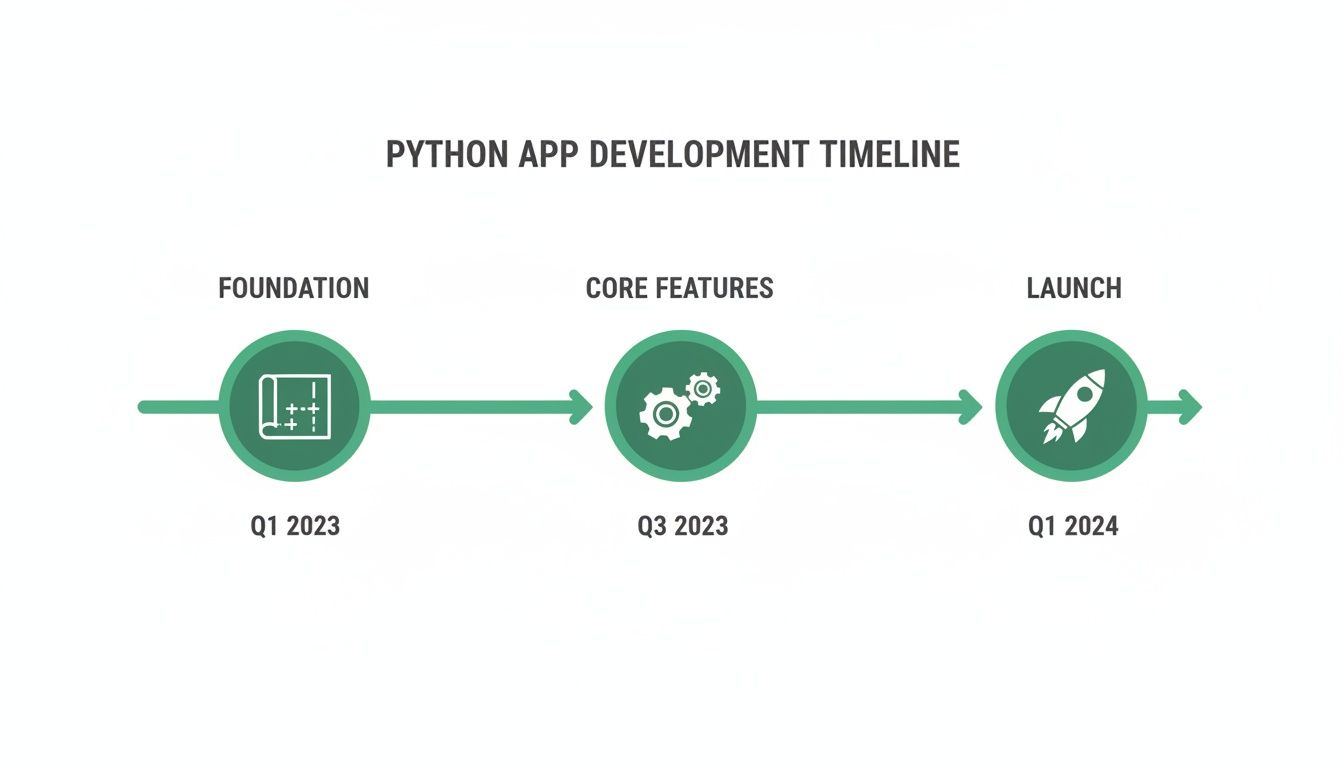
This roadmap helps demystify the entire process, showing a clear, logical progression from initial planning to a fully deployed product you can be proud of.
To give you a more granular view of how this plays out, here’s a checklist that breaks down the key activities and your role as the founder week by week.
6-Week Migration Timeline Checklist
| Week | Key Milestones | Founder's Role |
|---|---|---|
| Week 1 | Project kickoff, schema review, setup of Django or FastAPI project, and PostgreSQL database setup. | Provide final schema map, grant access to no-code platform, and provide any third-party API keys. |
| Week 2 | Build out user authentication (registration, login, roles). Set up cloud infrastructure (AWS, Vercel) and create the private GitHub repo. | Review the new data model to ensure it matches your business logic. Be available for quick questions. |
| Week 3 | Develop core API endpoints for primary application features. Set up a staging environment for review. | Participate in the first weekly staging demo. Provide feedback on functionality and user flows. |
| Week 4 | Build out secondary features and APIs. Refine existing endpoints based on your feedback. | Continue weekly reviews of the staging environment. Test new features as they become available. |
| Week 5 | Write and test the data migration script. Conduct comprehensive automated and manual QA testing. Set up CI/CD pipeline. | Review the results of the test data migration. Give the green light for the production migration plan. |
| Week 6 | Perform final data migration, point the domain to the new servers (Go-Live!), and conduct the full handover. | Celebrate the launch! Receive all code, credentials, and documentation. You now own your tech. |
This timeline isn't just about hitting deadlines; it's about building momentum and ensuring you, the founder, are an active participant in bringing your vision to life.
Weeks 1-2: The Foundation
The first two weeks are all about architecture and groundwork. This is where we translate the blueprint you created from your no-code app into a solid technical foundation. The goal here is to build the skeleton of your new application, which allows us to add features quickly in the following weeks.
During this phase, the development team is laser-focused on three critical areas:
- Core Architecture and Database: We’ll get the PostgreSQL database configured based on your schemas and establish the core structure of the Django or FastAPI project. Think of it as pouring the concrete foundation for a new building.
- Authentication and User Models: A secure and scalable user authentication system is built from scratch. This usually covers endpoints for user registration, login, password resets, and role-based permissions, completely replacing the often-clunky user management of no-code tools.
- Initial Environment Setup: We'll configure the initial cloud infrastructure on a provider like AWS or Vercel and create a private GitHub repository. This repo is where all your valuable code will live. If you're new to this, check out our guide on how to use Git for version control.
As a founder, your main job during these two weeks is to be available for quick clarifications. You’ll be asked to review the new data model to confirm it perfectly reflects your business logic and provide any API keys we need for third-party services.
Weeks 3-4: Building Core Features and APIs
With the foundation solidly in place, the project's velocity picks up dramatically. Weeks three and four are all about building the core features that deliver real value to your users. The focus shifts away from infrastructure and squarely onto implementing the business logic that makes your application unique.
This is the most interactive part of the whole sprint. Your development team will be building out API endpoints for all the main functions of your app—things like creating projects, processing data, or managing subscriptions. The key to making this phase successful is constant communication and feedback.
A non-negotiable part of this phase is a weekly staging demo. Your development partner should deploy the latest progress to a private staging server for you to test and review. This ensures there are no surprises and that the final product perfectly matches your vision.
By the end of week four, you should have a functional, albeit empty, version of your application running on a staging environment. You’ll be able to click through the main user flows and see your vision truly coming to life in code.
Week 5: Migration and Hardening
Week five is when the new system gets its first real stress test. The focus moves from building new features to migrating data, performing rigorous testing, and preparing for a silky-smooth launch. This is the dress rehearsal before opening night, designed to catch any hiccups before they can affect your users.
The main activities for this week include:
- Data Migration: A script is written and thoroughly tested to pull all your existing user and application data from Bubble or Airtable and import it into the new PostgreSQL database. This is a crucial step that demands careful validation.
- Rigorous Testing: The application undergoes comprehensive testing. This involves both automated tests that check the API’s functionality and manual "quality assurance" (QA) testing to ensure the user experience is flawless.
- CI/CD Pipeline Setup: A Continuous Integration/Continuous Deployment (CI/CD) pipeline is configured. This is an automated system that tests and deploys new code, which drastically speeds up future development and reduces the risk of human error.
Week 6: Deployment and Handover
The final week is all about crossing the finish line. This is where we harvest the fruits of the last five weeks of focused work. Your new, production-grade Python app goes live, and you take full ownership of the technology. The primary goal is a seamless transition with zero downtime for your users.
On launch day, the final, validated data migration is performed, and your domain is pointed to the new application servers. Once the app is live, the most important step happens: the complete handover.
This means you receive 100% of the intellectual property. All code is transferred to your private GitHub repository, and all infrastructure credentials for your cloud provider are securely passed to you. You are no longer renting a platform; you now own a valuable, scalable technology asset.
Implementing Secure Authentication and Payments
With your data mapped out and your tech stack chosen, it's time to tackle two of the most critical parts of any real application: user authentication and payments. Getting these right is non-negotiable for building user trust and, frankly, for having a viable business.
This is often where leaving the no-code world for a Python backend delivers its biggest "aha!" moment. You get to ditch the clunky workarounds and build robust, native systems that you fully control.
You're not starting from zero, though. The beauty of the Python ecosystem is that you can stand on the shoulders of giants. There are battle-tested libraries that handle the heavy lifting for both auth and payments, letting you focus on the user experience while maintaining a strong security posture.
Handling Authentication Like a Pro
For anything related to user sign-ups, logins, and password resets, leaning on a dedicated library is the only way to go. These tools are built from the ground up with security in mind, automatically protecting you from nasty vulnerabilities like cross-site scripting (XSS) and cross-site request forgery (CSRF).
- If you're using Django: The gold standard is Django Allauth. It’s a comprehensive toolkit that handles just about everything you can think of—social logins with Google or GitHub, email verification, and secure password management, all ready to go.
- If you're using FastAPI: A fantastic, modern choice is FastAPI Users. It’s highly modular, simple to set up, and supports different database backends and authentication methods like JWT and cookies.
Using one of these libraries means you’re not trying to reinvent the wheel on complex topics like password hashing or session management. You’re using a solution vetted by thousands of other developers, which is a massive win for both security and your own sanity. For a deeper dive, check out our guide on security best practices for web applications.
A quick tip for founders coming from Bubble: I always recommend mapping out every single user state. What happens if a trial expires? What if a user revokes their Google login token? Thinking through these edge cases from the start will make your new auth system far more resilient than what you had before.
Integrating Stripe for Seamless Payments
When it's time to handle money, Stripe is pretty much the undisputed champion for startups. Its API is a dream to work with, and the official Python client library makes integration feel surprisingly straightforward.
Moving your payment logic from a no-code connector or a Zapier-based workflow into your own backend gives you a level of control and reliability that’s simply on another level.
Here’s what a typical Stripe integration looks like in a Python app.
Core Stripe Integration Steps
- Setting Up Subscriptions: Your backend will now talk directly to the Stripe API. You'll write code to create customers, manage subscription plans, and process one-time payments. This completely replaces those fragile Zapier automations, making everything faster and far less likely to break.
- Managing Webhook Events: This is the absolute key to a solid integration. You’ll set up a dedicated API endpoint in your app that listens for events—or webhooks—from Stripe. These events are just messages telling you when something important happens, like a successful payment (
invoice.paid), a failed charge (invoice.payment_failed), or a canceled subscription (customer.subscription.deleted). - Handling Customer Data Securely: On your end, you'll store the Stripe Customer ID and Subscription ID in your PostgreSQL database, linking them directly to your user model. This simple connection lets you instantly check a user's subscription status without having to ask the Stripe API every single time.
By handling these webhook events directly in your Python code, you can trigger actions with perfect precision. For example, the moment a customer.subscription.deleted event comes in, your code can immediately downgrade that user's account access in your database. It's this kind of instant, reliable logic that no-code tools often struggle to deliver consistently.
Deploying Your App and Owning Your Code
Alright, the code is written. Now comes the moment of truth: launching your app. This isn't just about flipping a switch; it's about setting up a professional, reliable system that can handle real users and grow with your business.
This is where you move past manual checks and start thinking like a seasoned engineering team. At the heart of it all is automated testing—scripts that meticulously check every part of your app's logic before a single user ever sees it. This is your safety net, catching bugs early and ensuring you deploy with confidence.
Automating Your Release with CI/CD
To really level up, you’ll want a Continuous Integration/Continuous Deployment (CI/CD) pipeline. It sounds technical, but just think of it as an automated assembly line for your code.
Every time a developer pushes a change, the CI/CD pipeline takes over.
- First, it builds the application, packaging everything up neatly.
- Next, it runs the entire suite of tests to make sure the new code didn't break anything.
- If everything passes, it automatically deploys the update to your live servers.
This simple, automated flow removes the risk of human error from your launches and lets you ship new features and bug fixes incredibly fast. It’s a non-negotiable part of building a production-grade Python app.
Cloud Deployment and Infrastructure
Your app needs a home, and that home is the cloud. Cloud platforms provide the raw computing power, databases, and networking to make your application accessible to the world. For most Python projects, you'll be looking at one of three major players:
- Amazon Web Services (AWS): The undisputed market leader with an exhaustive list of services for any imaginable need.
- Google Cloud Platform (GCP): A powerful alternative, especially strong in data analytics and machine learning.
- Vercel: A more modern, developer-focused platform that’s fantastic for apps with a React or Next.js frontend.
A good development partner won't just manually click around in a dashboard to set this up. They'll use Infrastructure as Code (IaC), defining your entire server setup in configuration files. This makes your infrastructure predictable, version-controlled, and easy to replicate or modify down the road.
The final handover is the most important milestone. This is the moment you officially take full ownership of every line of code, every configuration file, and every cloud credential. You are no longer renting a platform—you own a valuable technology asset.
Your Questions About Python App Development, Answered
Taking your app from a no-code MVP to a full-fledged custom application is a huge step. It’s natural to have questions about the cost, the timeline, and what it really means to own and manage a proper software asset. Let's tackle the most common concerns I hear from founders.
What Does It Really Cost to Migrate to a Custom Python App?
Every project has its own quirks, but a focused migration from a platform like Bubble to a custom Python backend usually fits a fixed-price model. For a standard six-week migration project, you should budget somewhere in the range of $30,000 to $60,000.
Think of it as a strategic investment. You’re not just building an app; you're building ownable intellectual property. This one-time cost gets rid of those pesky recurring platform fees and surprisingly expensive integration subscriptions. Most founders see a strong return on investment within the first year, and it makes your company infinitely more appealing to investors.
Do I Have to Be a Technical Founder to Manage This?
Absolutely not. A professional development process always ends with a thorough handover. You'll get a well-documented codebase designed so that any competent developer you bring on later can hit the ground running.
The goal isn't to turn you into a system administrator. The day-to-day management is made incredibly simple by a few key pieces of the puzzle:
- Automated Testing: This is your safety net. It automatically checks that new code doesn't break anything that's already working.
- CI/CD Pipelines: These pipelines handle deployments for you, which means less manual work and a much lower risk of human error when you push updates.
- Modern Cloud Infrastructure: We use managed services from providers like AWS that take care of all the server maintenance and heavy lifting behind the scenes.
The whole point is for you to own a solid, scalable asset that just works. You get to focus on your product vision, and the technology is there to reliably back you up.
What Are the Real Benefits Over Sticking with Zapier and Airtable?
It really boils down to three things: scalability, reliability, and long-term cost-efficiency.
A proper Python backend hooked up to a PostgreSQL database can handle thousands of users hitting it at the same time without breaking a sweat. Trying to do that with Airtable's API would bring everything to a grinding halt.
You also get to replace all those fragile, multi-step Zaps with clean, efficient code that runs internally. This move drastically cuts down on potential points of failure and immediately slashes your monthly subscription bills. But the biggest win? You own the code. That’s a critical asset for fundraising and the foundation for any serious long-term growth.
Ready to turn your no-code MVP into a scalable, production-grade asset? First Radicle specializes in migrating fragile projects to modern Python and React stacks in just six weeks, guaranteed. Own your code and build for the future.